
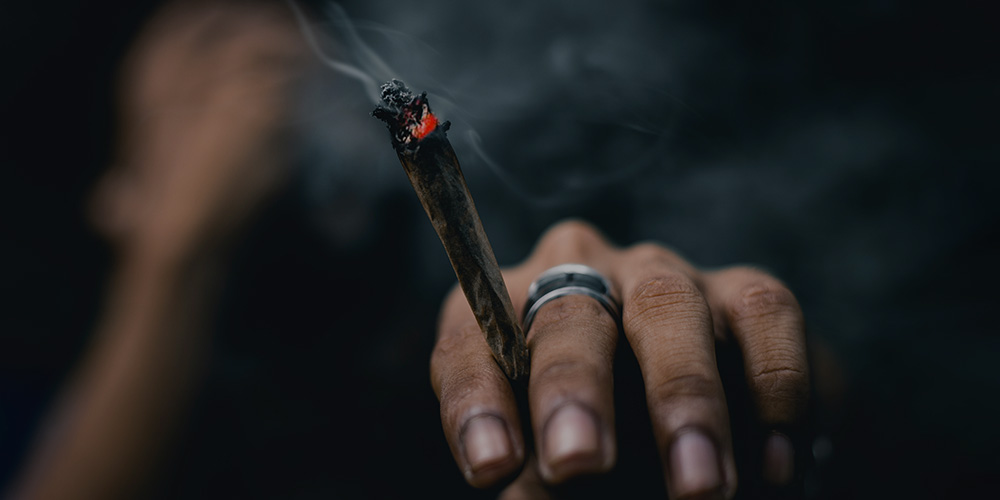
How To Light A Joint So It Doesn’t Canoe: The Ultimate Guide
Alright, let’s talk about something we all know can be a bit tricky—lighting a joint without turning it into a canoe. We’ve all been there, trying to enjoy a good session only to find ourselves fighting an uneven burn. If you’ve ever wondered how to light a joint properly and avoid the dreaded canoe effect, you’re in the right place.
Now, before we dive into the nitty-gritty, let’s acknowledge that smoking is a personal choice, and it’s important to do it responsibly. Whether you’re a newbie or a seasoned veteran, mastering the art of lighting a joint is a skill that’ll save you a lot of frustration. Trust me, nobody likes a joint that burns on one side and leaves the other untouched.
This guide isn’t just about lighting a joint—it’s about making sure you get the most out of your experience. We’ll cover everything from preparation to technique, so by the end of this, you’ll be a pro at avoiding canoe joints. Let’s get started, shall we?
- Reed Johnson Baseball Academy The Ultimate Training Ground For Future Stars
- Middle Class Fancy Discount Code Your Ultimate Guide To Saving Big
What Does It Mean When a Joint Canoes?
First things first, let’s clarify what we’re talking about. When a joint canoes, it means that one side burns faster than the other, creating an uneven burn. This usually happens because the joint wasn’t packed evenly or wasn’t lit correctly. It’s like driving a car with one flat tire—it just doesn’t work right.
Canoeing is annoying because it wastes your material and ruins the flow of your session. Who wants to keep stopping to fix the joint? Not me, and probably not you either. So, how do we prevent this? Let’s break it down.
Why Does a Joint Canoe?
There are a few reasons why a joint might canoe. Here are the most common ones:
- Old Republic Distillery Tavern A Timeless Escape For Whiskey Enthusiasts
- Italian Grinder Pasta Salad Your Ultimate Guide To A Flavorful Feast
- Poor packing: If the material inside the joint isn’t evenly distributed, one side will burn faster.
- Incorrect lighting technique: Lighting the joint unevenly can cause one side to burn quicker than the other.
- Moisture: If the material is too moist, it won’t burn evenly.
- Paper quality: Some rolling papers are just better than others. Cheap papers might not burn as smoothly.
Now that we know what causes canoeing, let’s talk about how to fix it.
How to Light a Joint Properly
Lighting a joint is more than just holding a lighter to it. There’s a technique involved, and once you master it, you’ll never have to deal with canoeing again.
Step 1: Prepare Your Joint
Before you even think about lighting your joint, make sure it’s packed properly. Here’s how:
- Grind your material evenly. You don’t want big chunks or super fine powder.
- Fill the rolling paper gradually, pressing the material down gently as you go.
- Make sure the joint is evenly packed from end to end. You can roll it between your fingers to check.
Proper preparation is half the battle. If your joint is packed well, you’re already ahead of the game.
Step 2: Light the Tip
When you’re ready to light up, follow these steps:
- Hold the joint horizontally. This gives you better control over the flame.
- Apply the flame to the tip of the joint, moving it back and forth to ensure even heating.
- Inhale gently as you light it. This helps draw the flame through the material.
Remember, patience is key. Take your time to ensure the entire tip is lit evenly.
Tips to Prevent Canoeing
Even with good preparation and lighting technique, sometimes things can go wrong. Here are a few extra tips to keep your joint burning smoothly:
- Use high-quality rolling papers. Brands like Zig-Zag or RAW are popular choices for a reason.
- Keep your material dry. Moisture can cause uneven burning, so store it in an airtight container.
- Roll the joint tightly but not too tight. You want air to flow through it, but not so much that it burns too fast.
These small adjustments can make a big difference in your smoking experience.
Common Mistakes to Avoid
Even the best of us make mistakes sometimes. Here are a few common ones to watch out for:
- Lighting one side of the joint instead of the entire tip.
- Packing the joint too tightly, which restricts airflow.
- Using a lighter with a weak flame or matches that don’t stay lit long enough.
Avoid these pitfalls, and you’ll be well on your way to mastering the art of joint lighting.
How to Fix a Canoeing Joint
Let’s face it—sometimes things don’t go as planned. If your joint starts to canoe, don’t panic. Here’s what you can do:
- Gently tap the joint on the side that’s burning faster to loosen the material.
- Re-light the tip, focusing on the side that’s burning unevenly.
- If it’s really bad, you might need to unroll the joint and repack it.
It’s not ideal, but it’s better than wasting your material.
Choosing the Right Rolling Papers
The quality of your rolling papers can make or break your joint. Here are some factors to consider:
Material
Rolling papers come in different materials, each with its own pros and cons:
- Wood pulp: The most common type, affordable but can burn unevenly.
- Hemp: More eco-friendly and burns smoother, but can be pricier.
- Rice: Thin and burns cleanly, but can be delicate.
Size
Choose the right size for your needs. King size papers are great for bigger joints, while 1 1/4 size is perfect for smaller ones.
Advanced Techniques
Once you’ve mastered the basics, you can try some advanced techniques to take your joint game to the next level:
- Use a crutch to add stability and prevent the joint from falling apart.
- Experiment with different rolling styles, like cones or spliffs.
- Try rolling with two papers for a thicker joint.
These techniques can add variety to your smoking experience and help you find what works best for you.
Conclusion
So there you have it, folks. Lighting a joint without canoeing is all about preparation, technique, and a little bit of practice. By following the steps outlined in this guide, you’ll be able to enjoy a smooth, even burn every time.
Don’t forget to share your newfound knowledge with your friends. And if you have any tips or tricks of your own, leave a comment below. Let’s keep the conversation going and help each other become better joint rollers.
Until next time, happy rolling!
Daftar Isi
Article Recommendations
- Front And Palmer Philadelphia The Ultimate Guide To A Vibrant Neighborhood
- George T Stagg 2024 A Deep Dive Into The Bourbon Worlds Most Coveted Release
Detail Author:
- Name : Vicky Hyatt II
- Username : kprosacco
- Email : javier.casper@wiza.com
- Birthdate : 1973-07-30
- Address : 3903 Ana Stravenue South Santiagoville, CO 80670
- Phone : +1 (463) 950-5933
- Company : Zemlak, Johnston and Nikolaus
- Job : Judge
- Bio : Non quia amet praesentium explicabo corporis est. Qui unde sint quo mollitia. Vel nostrum saepe accusantium voluptatum. Voluptatum voluptas non sint harum.
Socials
facebook:
- url : https://facebook.com/jbotsford
- username : jbotsford
- bio : Dolorem sint quibusdam animi velit voluptatem adipisci explicabo.
- followers : 2371
- following : 2217
linkedin:
- url : https://linkedin.com/in/jbotsford
- username : jbotsford
- bio : Distinctio consequuntur quo aliquam.
- followers : 3762
- following : 696
instagram:
- url : https://instagram.com/joseph_botsford
- username : joseph_botsford
- bio : Quia odio nam enim vel voluptatem sunt molestiae. Iure quibusdam ea hic. Totam error atque quia.
- followers : 2319
- following : 2210
